The level 50 Champion Quest Line Part Two: Unravelling and Culmination
This is a guide to the later steps in the level 50 Champion Quest series in Dark Age of Camelot. You can find a guide to the first part of this quest chain in my previous post, and a general overview of Champion Levels here.
This guide is mainly intended to get you through parts of this quest series that are confusing or out of date in the modern game. This isn't a standalone guide, you will still need to read the quests as you go to progress. I haven't been able to find anything at all on the web that gives hints for some of the very last steps in this chain. This guide should be enough to get you through all of the parts that can be soloed without using a buffbot.
Unraveling: Infernal Investigation
Like some of the last quests in this series, many of the instructions given by the quest text are either confusing or badly out of date with the modern game. For example, one part for hibernian players instructs them to go the the "frontier side" of Cruachan Gorge...which isn't very helpful since the entire zone is "frontier side" by definition. The quest is especially confusing on Gaheris since the portal stones that the first part of the quest refers to don't exist on that server. This is also one of longer quests in this chain.
In any case, the first thing you need to do is talk to your contact in the throne room. He sends you back to the same NPC that you gave the charred note fragments to in the last quest "Consulting the Keeper." This NPC will then send you out to the Frontiers. The quest text about where to go can be a bit confusing. What you need to do is head to one of your faction's border keeps. When you arrive, exit to the frontiers and look for an NPC hiding in a recess in the walls of the keep on your left as you exit (to the right if you are facing the keep entrance).
Albion: Castle Sauvage, look for Valayalla
Hibernia: Druim Ligen, look for Venana
Midgard: Svasud Faste, look for Thurid
After a conversation, you will get a location scroll that suggests where to look for demon summoning stones. Many of the landmarks it refers to haven't been in the game for years, and seemingly very few of these stones still exist. The only ones that I have been able to find consistently are the two in Cruachan Gorge. I have used these to complete the quest on hibs, mids and albs. One stone is west of Dun Ailinne near the road (near loc 36957, 48460), the other is north of it across the river (near loc 51673, 17532).* The spots where the stones are found are not very busy with other players in my experience. I've rarely even seen anyone else when I was fighting infernalists (see below).
The goal is to destroy five demon summoning stones and collect fragments from them. The quest implies that you need to ride all over the frontiers looking for stones, but that really isn't the case. The two in CG are all you will need. Sometimes you can even get the quest done by waiting for a stone to respawn at one spot after you destroy it (I have actually gotten all five fragments at one spawn point before). However, generally you need to ride back and forth between the two locations in CG. If there isn't a stone at either of the locations I listed, the best thing to do is likely to log out and check back later (sometimes they can take ten+ minutes to respawn).
Once you find a stone and worshippers, you need to take out the stone. A lot of the info I found about these stones online is wrong or at least out-of-date. For example, you don't have to be standing on the stone when you destroy it to get a Chunk of Demon Stone, and these encounters can certainly be soloed. You can pull two or three worshipers at a time and gradually clear out all the mobs around a stone (more advice for melees below). That makes the stone a lot easier to "kill." Alternately, if you have high ranged burst damage you can just spam down the stone and run away. You don't need to kill the worshippers to get the fragments you need. Even if you leave the worshippers completely alone, a stone will eventually respawn after you destroy it.
Melee characters: I have found these to encounters to be pretty tough on some melee classes. The Shield of the Soul Champion Level ability helps a lot, as does anything that gives you heat resistance. If you plink one of the regular infernalists with a ranged attack, sometimes they won't BAF and can be killed one at a time. If you get a group, keep in mind that all of the infernalists do roughly the same damage regardless of whether they con blue, yellow or orange. When fighting multiples, kill the weakest ones first to cut down on the damage you are taking as quickly as possible. Finally, if worst comes to worst you can kill one or two and then run away. They respawn slowly enough that you can generally clear out a stone this way.
Once you have Five Chunks of Demon Stone you can head back and give them to the NPC outside the border keep. Hand him the entire stack. He will give you a teleportation stone, which you need to head back to your capital to use. In some cases you need to be in the part of the city where the caster class trainers hang out to use the stone (e.g., the Academy of Magic for Albs).
After you use the teleportation stone, you will appear in the Arcane Tower from the one of the first quests in this series. When you arrive get ready for a fight (e.g., buff yourself and get out a pet if you have one). When you are prepared, give the Chunks of Demon Stone to the Keeper NPC and talk to him to start the ritual.
After you kill the demon talk to the Keeper NPC again, then head back (to quickly get back use the teleportation stone again) and talk to your contact in the throne room.
830 gold, 13440 CXP (more than half a level).
*Update: I also recently found one of these stones in Mount Collary, west of the tower in the center of the zone near loc 31304, 30766. I assume there are others.
Unraveling: Illusions of Grandeur
Part One
The first part of this quest has you gathering components to make a disguise. The steps vary by realm, but the quest text is accurate until the very last step (see below). Your contact sends you to talk to an NPC, target the NPC and "/say illusion." This NPC then sends you off to gather the ingredients she needs.
Hibernia: The quest instructions are generally pretty clear, but I found the final target, Feral Fecan Hunter near loc 6495, 41420, harder to find due to vague directions. A water breathing potion is a big help for the first two parts.
Albion: The first mob is easy enough to find. However, the pain eater is confusing if you didn't think to write down the instructions the NPC gave you in her dialogue. You need to go to an abandoned house SE of Caer Ulfwych (loc 54658, 48589). Kill all the gray disturbed presences until the pain eater spawns. The Feral Goblin Hunter is due east of the quest giver past the cave on the in-game map, at the north end of a small abandoned road out in the middle of the woods (near loc 30997, 6799).
Midgard: I found all of the quest instructions to be quite clear. A water breathing potion helps with the first part but isn't necessary.
Hand the ingredients to the NPC in the order she asks for them. The quest dialogue on this step is actually pretty funny. The NPC will give you a gem and send you to the High Consul's Sanctum. If you look at the in game map, the location is marked with a small cave icon.
Once you enter the sanctum, use the gem. This will put a vest and pair of pants in your inventory which you need to equip. Go and talk to the High Consul. He will give you a History of the Uruz which, after finishing your conversation with the High Consul, you take to a minotaur NPC outside near the sanctum. The hibernian NPC (Graoch the Ranger loc 17379,9814) is the only one that I found hard to locate my first time through.
Note: If you use the History it will put a bunch of scrolls in your inventory that you will have to destroy (Shift+D) to get rid of, though they are an interesting read if you are into lore.
Hand the history to the minotaur NPC, head back to the sanctum, and talk to the High Consul again. Select "explain" unless you want another copy of the history. He gives you a signalling whistle, and a quest that was pretty clear up until now goes straight to hell.
Part two
I was stuck on this step for a long time because the "labyrinth entrance" it sends you to is no longer in the game, and even if you have an idea of where to look finding the exact spot to use the whistle can be tricky. You need to head to Ellan Vanin and go to the gray tower icon on the map near your faction's entrance to the zone (near the gate). On Ywain there is at least still a tower on the spot, on Gaheris there is nothing there at all. Look for a clump of trees or bushes near the (possibly non-existent) tower and use the whistle. Talk to the minotaur NPC that appears to complete the quest.
Hibernia: near loc 6367, 48971.
On Ywain there are about a half dozen grannies standing in the spot you want. You need to clear them out before you use the whistle.
Albion: near loc 59865, 48247.
It may take a few tries to find the exact spot, stand in front of the rocks in the middle of some trees (surrounded by frogs on Gaheris).
Midgard: near loc 29798, 13437.
On Gaheris the NPC runs into the middle of a nearby swarm of icestriders when you summon him. Either clear them out and then talk to him or talk to him while they beat on you and run away once the next quest is started.
Continue talking to the NPC until he gives you the next quest.
518 gold, 8000 CXP.
Unraveling: Crush the Alliance
Note: Almost all of the quest text instructions from here on out are still accurate in the modern game.
This and the next few quests are a good introduction to the Labyrinth if you haven't had a reason to go there yet. The minotaurs sometimes drop random mythirians and magic items. Nothing too spectacular, but on a fresh 50 some of it can (rarely) be an upgrade from king's gear. If you are on Gaheris they also drop glowing dreaded seals at a decent rate in the deeper areas like Clockwork. I've gotten anywhere from 4 to 25 seals doing these quests (6-8 is pretty typical), and depending on how much I used shortcuts rather than following the maps on foot.
Part One
The NPC from the last step gives you a map. From your realm's entrance to the labyrinth, use the map and follow the directions. Alternately, to save time, instead of following the map directions take the Obelisk near the entrance to Nurizane's Crossroads. The very end of the directions will direct you to the first set of corpses.
You will be looking for a lot of corpses. You don't need to click on them, just run up to them. As you find each set of bodies the quest will update and you can use the map to get directions to the next set of corpses.
This is a common set of locations, but others are possible even on different runs using classes of the same faction:
1. Loc 46707, 24969
2. Loc 45731, 16312
3. Loc 39169, 27990
4. Loc 37002, 30465
5. Loc 31273, 27717
6. Loc 34099, 27547
7. Loc 36875, 29318*
The first locations appear to be somewhat random, but the directions when you use the map you were given are generally pretty clear. The last location is always the same. At this last location you will get jumped by an Orange Doppleganger. There is also a purple NPC (the Stonemason) patrolling nearby that will likely butcher you if you try to solo him. Run away up the stairs if he jumps you. Finally, after you beat the doppleganger at the last location, head back to the entrance to the Labyrinth.
Part Two
From to the labyrinth the entrance, follow the map directions to a collapsed Minotaur. The goblins on the way are often neutral to you. If so you can run right past them.
Albion: Crassyne, near loc 37526, 36025*
Hibernia: Carnue, near loc 23643, 15046
Midgard: Guntry, near loc 55608, 4958
The suspicious goblins surrounding the collapsed NPC will turn into dopplegangers when approached or pulled. They don't BAF, so you can safely clear them out by pulling them one at a time. The NPC will then send you to kill the Currupt Alchemist in the clockwork section of labby. If you use the map and follow the directions, he isn't too hard to find.
Optional Shortcut: head back to the entrance, use the obelisk to teleport to the Clockwork: Shrine of Tegashirg. The alchemist is just NW of where you arrive, hanging out behind a pile of crates near loc 30704, 29192.
When you kill the alchemist, he will drop a Poison Antidote. Go back and talk to the NPC near the entrance. Occasionally I have had all of the dopplegangers respawn on top of me when I started talking to the NPC. When this happens I ignore them, finish the conversation, and then run them off.
*The Alb one is a bit harder to find than the others: Left at statue, follow the passage around the corner to the right, left at the next 4 way (turn left when you can see the entrance to the stairs down), right at the next intersection (towards the wall sconce with the glowing green gem embedded in it), follow the passage left when you get to the wall sconce, left again at the next intersection at another wall sconce, then take your next right and follow the passage back.
Part Three
Next you will be sent to frame minotaurs for murder. In each case there will be a named mob you need to kill surrounded by soldiers, after which you go to the spot the named mob was standing in and use an item from your inventory to plant fake evidence. Generally the soldiers don't BAF so you can clear them out by pulling them one at a time and then go after the named mob. After you kill the named, you need to be standing very close to where he spawns to use the item you are supposed to plant. Be sure the "use" icon for the right item is set to your hotbar before you start these encounters. Check your quest journal to see which one you need to use for any given encounter.
Very often, the named mob and or his guards will respawn on top of you practically the moment you kill him. If you are still standing in the right spot, you can use your item and run away. Either run to a safe spot and kill everyone again, or try to run them off. If everything went well, the item you used will be gone from your inventory and your quest journal will tell you what to do next. The kill targets are:
(1st) Commander Ellerdos (Commander's Buckle ...NOT Button!): Near Loc 47057, 26710
(2nd) Commander Ottogron (Thelo Commander's Button): Near Loc 50387, 15627
The quest instructions about what item to use are sometimes wrong/ reversed. If you get the error message "Now is not the right time to use this item" after killing the first commander, use the other item instead. You might want to have both slotted to your hotbar when you kill him just in case. The kill targets that you are assigned may possibly vary somewhat from the two I listed above (if so, not very often). Regardless, the quest instructions are pretty clear on what hallways to look for your targets in. If you were able to find all the corpses in part one, you should have no problems.
After framing innocent minotaurs for two murders, go back to the trees near the (possibly non-existent) tower in Ellan Vanin and use your signalling whistle again.
Part Four
Head back to labby for two more murder frame-ups. Teleport back to the Shrine of Tegashirg in the Clockwork section. From the obelisk where you arrive, the first target is NW past the Currupt Alchemist. The second target is due west near a giant gear.
(3rd) Commander Talidrarg (Deifrang Signet Ring): Near loc 29423, 29406
(4th) Commander Irodrim (Korazh Insignia): Near loc 25380, 29481
After using the insignia, go back to the trees near the tower icon in Ellan Vanin and use your signalling whistle one more time. Done finally!
1 platinum and a bit of gold, 20160 CXP
Note: If you are not playing a class or spec that melees well, you might have trouble finishing the next step without a party or a buffbot. Especially on a petless caster like a Runemaster or an Eldritch, you might want to wait until you have help available to accept the next quest (see below).
Unraveling: Kingly Crisis*
This is pretty neat quest. After talking to the NPC in EV, head to the throne room, ready for a fight. Eventually a demon you need to kill spawns. He cons purple at first, but will eventually debuff to orange (generally when you attack). This fight is a piece of cake on a character that melees well. On a pure caster, it can be a bit more tricky (see below). Once you beat the demon talk to the high consul, the king, and then your contact.
Pure casters: The boss can be killed solo on a bolt caster like a wizard or eldritch, it's just a pain.** Kite the demon around the room and use pillars or other geometry to confuse him. Once you get far enough away, hit "face", snap off one or two high damage spells, then keep running. Once you whittle his health down enough, a group of minotaurs will show up and start beating on him.
If you need to kite the demon out of main room, don't re-enter. All of the dopplegangers will respawn when the boss leaves the room. Even outside of the main throne room, if you get the boss down low enough the minos will still spawn and start attacking. Once you kill the demon, the quest will update even if the dopplegangers are still hanging out in the throne room. You may need to talk to the high consul -> king -> contact -> high consul while getting beat on by dopplegangers to finish this quest and start the next one. Once you start the next quest, leaving the throne room and re-entering will get rid of any leftover dopplegangers.
518 Gold, 8400 CXP
*Don't start this quest unless think you can finish it! Once you start it the quest cannot be abandoned, and the throne room will be completely jacked up (i.e., infested with angry dopplegangers) every time you enter it until you manage to kill the demon. You will still be able to run in and talk to the king to go up CLs even if the room is infested with dopplegangers, but doing things like buying bounty point (illustrious) weapons will be annoyingly difficult (digging through NPC menus while getting beat on by four mobs isn't fun).
**I have done this solo in all three realms using bolt casters. Hibernia using a void Eldritch was by far the hardest of the three, and the only one where I actually needed to leave the main room. The hibernian main throne room is not set up well for kiting, instead I ended up running in circles around a planter in the middle room.
Culmination: Plan for Success
Once you start this quest, you are sent back to the Labyrinth to look for a priest. If you follow the map the quest hands out you'll get decent CXP from kills and at least a few seals if you are on Gaheris. You can also take a shortcut:
Albion: From the obelisk at the entrance to the labyrinth, go to Flooded: Shrine of Vartigeth (South)
Hibernia: From the obelisk at the entrance to the labyrinth, go to Flooded: Shrine of Vartigeth (North)
Midgard: From the obelisk at the entrance to the labyrinth, go to Flooded: Shrine of Vartigeth (West)
The NPC you need to talk to is at the top a set of stairs near where you arrive. Target him and "/say resealing the Labyrinth."
1 platinum and some gold, 11200 CXP
Culmination: Lost, But Not Forgotten
Most of the steps in this quest are pretty easy to solo and self explanatory if you follow the instructions. For the first step, you just need to kill ten of the nearby corrupt priests.
Albion: the corrupt priests the near the Albion minotaur high priest most often con red. If you have made it this far chain killing reds shouldn't be a problem for you, but if you want a slightly easier time on this step teleport to Flooded: Shrine of Vartigeth (North or West). The majority of priests near those obelisks are generally orange.
The next step is to kill ten "corrupt engineers" for hammers and chisels. The only place I have been able to consistently find engineers is near the Shrine of Tegashirg in the Clockwork section. From the obelisk after you teleport in a few can spawn in the NW passage near the corrupt alchemist, but the best place to look for them is passage due West. If you don't see any, murder all the minotaurs in the western hallway down to the second intersection (the next intersection after the one with the gear), clear the passage that loops around to the south and back east from the second intersection, and finally wait for everything to respawn. You'll generally get at least two or three engineers as random respawns each time you clear out the hallway and the southern loop.
The last step has you gathering ward stone fragments. Some interesting flavor text appears when you pick up each fragment. When you have all 12, give the stack of fragments (which look like DF blood seals) to the High Priest to finish the quest.
Albion: there are no fragments near you when you get last step, and the quest text doesn't tell you where to look for them save in the flooded sections of the catacombs. I would have been utterly baffled by this if I had happened to try this chain on Albion before I had done it with characters from the other two realms. You need to head go to Flooded: Shrine of Vartigeth (North) or (West) to get the fragments. There are also a few up the stairs nearby, but you'll need to kill several (most likely red con) priests to even get to the first one.
1 platinum and some gold, 16000 CXP
Culmination: Thivek's Fire
This appears to be the last quest in the chain. The quest sends you to kill two bosses deep in the labyrinth, and use an item in your inventory after you beat each boss. The first boss can be soloed with a few classes. The second boss is likely impossible without at least a buffbot.
Boss 1: Adjucator II.
Shortcut: Take an obelisk to Clockwork: the Great Forge of Thivek, head SW
You will need a party or at least a buffbot to take out this boss on most classes. I have been able to solo it after a few tries using a tank pet buffed with the Convoker ML 9 ability (Summoning Mastery) on an Enchanter. I imagine any class with access to strong pets and summoning mastery could likely solo this boss, albeit not without a bit of luck.
To kill the Adjucator, you have to first clear all the goblin repairmen around him. You only have to clear the center of the room and the part of the room near the boss. If any repairmen respawn kill them first before focusing on the boss again, or they will keep him healed. He generally spawns as a purple, but sometimes only as a red. Regardless, he has a ton of hitpoints and hits like a truck. If I recall correctly you also can't really kite him because if you get too far out of the room after you pull him he resets, and it's too hard to keep both halves of the room clear of repairmen solo.
Once the boss drops, quickly use the item the priest gave you to complete this part of the quest.
Boss 2: Maghras
Shortcut: Take an obelisk to Clockwork: Construct Assembly Room, head west.
I assume this is the final step in this entire quest chain. The majority of classes certainly can't solo this boss. I haven't been able to even using a ML 9 enhanced pet (but admittedly I've only tried once or twice). However, he is doable on some classes using only a buffbot (at least based on this youtube guide to farming him). I don't know if there are any steps past this fight because I've never beaten it, and there is no further information about this quest that I could find online. I assume the final reward is just more CXP and a platinum (and possibly a pat on the head), so I haven't yet tried to get a party together to take him down.
Regardless, if you have made it this far congratulations. You have gone through one of the more obscure and challenging (mostly) soloable quest chains in the game!
This guide is current as of March 2018, DAoC version 1.124D.
This guide is mainly intended to get you through parts of this quest series that are confusing or out of date in the modern game. This isn't a standalone guide, you will still need to read the quests as you go to progress. I haven't been able to find anything at all on the web that gives hints for some of the very last steps in this chain. This guide should be enough to get you through all of the parts that can be soloed without using a buffbot.
Unraveling: Infernal Investigation
Like some of the last quests in this series, many of the instructions given by the quest text are either confusing or badly out of date with the modern game. For example, one part for hibernian players instructs them to go the the "frontier side" of Cruachan Gorge...which isn't very helpful since the entire zone is "frontier side" by definition. The quest is especially confusing on Gaheris since the portal stones that the first part of the quest refers to don't exist on that server. This is also one of longer quests in this chain.
In any case, the first thing you need to do is talk to your contact in the throne room. He sends you back to the same NPC that you gave the charred note fragments to in the last quest "Consulting the Keeper." This NPC will then send you out to the Frontiers. The quest text about where to go can be a bit confusing. What you need to do is head to one of your faction's border keeps. When you arrive, exit to the frontiers and look for an NPC hiding in a recess in the walls of the keep on your left as you exit (to the right if you are facing the keep entrance).
Albion: Castle Sauvage, look for Valayalla
Hibernia: Druim Ligen, look for Venana
Midgard: Svasud Faste, look for Thurid
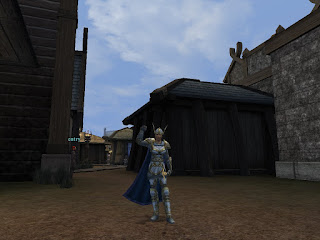
 |
| Thurid, the Frontiers NPC Midgard characters get sent to talk to. All of these NPCs are small and hiding in a recess in the keep walls near the gate of a border keep. Until working through this quest chain, I don't think I had noticed any of them. |
After a conversation, you will get a location scroll that suggests where to look for demon summoning stones. Many of the landmarks it refers to haven't been in the game for years, and seemingly very few of these stones still exist. The only ones that I have been able to find consistently are the two in Cruachan Gorge. I have used these to complete the quest on hibs, mids and albs. One stone is west of Dun Ailinne near the road (near loc 36957, 48460), the other is north of it across the river (near loc 51673, 17532).* The spots where the stones are found are not very busy with other players in my experience. I've rarely even seen anyone else when I was fighting infernalists (see below).
 |
| One of the demon summoning stones in Cruachan Gorge. If you have high ranged DPS you can target the stone, spam it down and run away. Once you get a Chunk of Demon Stone in your inventory you are done, even if the stone appears to have a sliver of health left. On melee classes, you will have to carefully pull a few infernalists at a time until you can get to the stone. Both the quest text and some of the few posts I've found online about this quest warn you to bring a party, but these are quite doable solo if you are careful. |
The goal is to destroy five demon summoning stones and collect fragments from them. The quest implies that you need to ride all over the frontiers looking for stones, but that really isn't the case. The two in CG are all you will need. Sometimes you can even get the quest done by waiting for a stone to respawn at one spot after you destroy it (I have actually gotten all five fragments at one spawn point before). However, generally you need to ride back and forth between the two locations in CG. If there isn't a stone at either of the locations I listed, the best thing to do is likely to log out and check back later (sometimes they can take ten+ minutes to respawn).
 |
| The other stone in Cruachan Gorge. The number and strength of infernalists you will find guarding a stone is quite variable. |
Once you find a stone and worshippers, you need to take out the stone. A lot of the info I found about these stones online is wrong or at least out-of-date. For example, you don't have to be standing on the stone when you destroy it to get a Chunk of Demon Stone, and these encounters can certainly be soloed. You can pull two or three worshipers at a time and gradually clear out all the mobs around a stone (more advice for melees below). That makes the stone a lot easier to "kill." Alternately, if you have high ranged burst damage you can just spam down the stone and run away. You don't need to kill the worshippers to get the fragments you need. Even if you leave the worshippers completely alone, a stone will eventually respawn after you destroy it.
 |
| Getting to these stones on a class that lacks strong ranged damage can be a bit tricky, as you have to clear out all of the infernalists before you can safely get into melee range of the stone. |
Melee characters: I have found these to encounters to be pretty tough on some melee classes. The Shield of the Soul Champion Level ability helps a lot, as does anything that gives you heat resistance. If you plink one of the regular infernalists with a ranged attack, sometimes they won't BAF and can be killed one at a time. If you get a group, keep in mind that all of the infernalists do roughly the same damage regardless of whether they con blue, yellow or orange. When fighting multiples, kill the weakest ones first to cut down on the damage you are taking as quickly as possible. Finally, if worst comes to worst you can kill one or two and then run away. They respawn slowly enough that you can generally clear out a stone this way.
Once you have Five Chunks of Demon Stone you can head back and give them to the NPC outside the border keep. Hand him the entire stack. He will give you a teleportation stone, which you need to head back to your capital to use. In some cases you need to be in the part of the city where the caster class trainers hang out to use the stone (e.g., the Academy of Magic for Albs).
After you use the teleportation stone, you will appear in the Arcane Tower from the one of the first quests in this series. When you arrive get ready for a fight (e.g., buff yourself and get out a pet if you have one). When you are prepared, give the Chunks of Demon Stone to the Keeper NPC and talk to him to start the ritual.
 |
| Prepare yourself for a fight when you get to the Arcane Tower. If you are playing a pure caster (for example something like a void eldritch that doesn't have a pet and can't fight it's way out of a wet paper bag in melee), you can tell the Keeper NPC to start the ritual and then run to the far end of the tower while you wait for this demon to spawn. |
After you kill the demon talk to the Keeper NPC again, then head back (to quickly get back use the teleportation stone again) and talk to your contact in the throne room.
830 gold, 13440 CXP (more than half a level).
*Update: I also recently found one of these stones in Mount Collary, west of the tower in the center of the zone near loc 31304, 30766. I assume there are others.
Unraveling: Illusions of Grandeur
Part One
The first part of this quest has you gathering components to make a disguise. The steps vary by realm, but the quest text is accurate until the very last step (see below). Your contact sends you to talk to an NPC, target the NPC and "/say illusion." This NPC then sends you off to gather the ingredients she needs.
Hibernia: The quest instructions are generally pretty clear, but I found the final target, Feral Fecan Hunter near loc 6495, 41420, harder to find due to vague directions. A water breathing potion is a big help for the first two parts.
Albion: The first mob is easy enough to find. However, the pain eater is confusing if you didn't think to write down the instructions the NPC gave you in her dialogue. You need to go to an abandoned house SE of Caer Ulfwych (loc 54658, 48589). Kill all the gray disturbed presences until the pain eater spawns. The Feral Goblin Hunter is due east of the quest giver past the cave on the in-game map, at the north end of a small abandoned road out in the middle of the woods (near loc 30997, 6799).
Midgard: I found all of the quest instructions to be quite clear. A water breathing potion helps with the first part but isn't necessary.
Hand the ingredients to the NPC in the order she asks for them. The quest dialogue on this step is actually pretty funny. The NPC will give you a gem and send you to the High Consul's Sanctum. If you look at the in game map, the location is marked with a small cave icon.
 |
| The vest and pants grant you a Minotaur illusion. |
Once you enter the sanctum, use the gem. This will put a vest and pair of pants in your inventory which you need to equip. Go and talk to the High Consul. He will give you a History of the Uruz which, after finishing your conversation with the High Consul, you take to a minotaur NPC outside near the sanctum. The hibernian NPC (Graoch the Ranger loc 17379,9814) is the only one that I found hard to locate my first time through.
Note: If you use the History it will put a bunch of scrolls in your inventory that you will have to destroy (Shift+D) to get rid of, though they are an interesting read if you are into lore.
Hand the history to the minotaur NPC, head back to the sanctum, and talk to the High Consul again. Select "explain" unless you want another copy of the history. He gives you a signalling whistle, and a quest that was pretty clear up until now goes straight to hell.
Part two
I was stuck on this step for a long time because the "labyrinth entrance" it sends you to is no longer in the game, and even if you have an idea of where to look finding the exact spot to use the whistle can be tricky. You need to head to Ellan Vanin and go to the gray tower icon on the map near your faction's entrance to the zone (near the gate). On Ywain there is at least still a tower on the spot, on Gaheris there is nothing there at all. Look for a clump of trees or bushes near the (possibly non-existent) tower and use the whistle. Talk to the minotaur NPC that appears to complete the quest.
Hibernia: near loc 6367, 48971.
On Ywain there are about a half dozen grannies standing in the spot you want. You need to clear them out before you use the whistle.
Albion: near loc 59865, 48247.
It may take a few tries to find the exact spot, stand in front of the rocks in the middle of some trees (surrounded by frogs on Gaheris).
Midgard: near loc 29798, 13437.
On Gaheris the NPC runs into the middle of a nearby swarm of icestriders when you summon him. Either clear them out and then talk to him or talk to him while they beat on you and run away once the next quest is started.
 |
| This is the spot for Midgard players. This step of the quest is quite fidgety. Even knowing where to go and having done this quest several times, I usually have to use the whistle three or four times to find the exact spot. |
Continue talking to the NPC until he gives you the next quest.
518 gold, 8000 CXP.
Unraveling: Crush the Alliance
Note: Almost all of the quest text instructions from here on out are still accurate in the modern game.
This and the next few quests are a good introduction to the Labyrinth if you haven't had a reason to go there yet. The minotaurs sometimes drop random mythirians and magic items. Nothing too spectacular, but on a fresh 50 some of it can (rarely) be an upgrade from king's gear. If you are on Gaheris they also drop glowing dreaded seals at a decent rate in the deeper areas like Clockwork. I've gotten anywhere from 4 to 25 seals doing these quests (6-8 is pretty typical), and depending on how much I used shortcuts rather than following the maps on foot.
Part One
The NPC from the last step gives you a map. From your realm's entrance to the labyrinth, use the map and follow the directions. Alternately, to save time, instead of following the map directions take the Obelisk near the entrance to Nurizane's Crossroads. The very end of the directions will direct you to the first set of corpses.
You will be looking for a lot of corpses. You don't need to click on them, just run up to them. As you find each set of bodies the quest will update and you can use the map to get directions to the next set of corpses.
 |
| You'll be looking for a lot of these pairs of dead minotaurs. Approach them and you'll get a bit of flavor text when your quest updates. |
This is a common set of locations, but others are possible even on different runs using classes of the same faction:
1. Loc 46707, 24969
2. Loc 45731, 16312
3. Loc 39169, 27990
4. Loc 37002, 30465
5. Loc 31273, 27717
6. Loc 34099, 27547
7. Loc 36875, 29318*
The first locations appear to be somewhat random, but the directions when you use the map you were given are generally pretty clear. The last location is always the same. At this last location you will get jumped by an Orange Doppleganger. There is also a purple NPC (the Stonemason) patrolling nearby that will likely butcher you if you try to solo him. Run away up the stairs if he jumps you. Finally, after you beat the doppleganger at the last location, head back to the entrance to the Labyrinth.
 |
| If you get jumped by this guy (here seen smacking the hell out of my pet before I left him behind and ran away like a little girl), run back up the stairs. |
Part Two
From to the labyrinth the entrance, follow the map directions to a collapsed Minotaur. The goblins on the way are often neutral to you. If so you can run right past them.
Albion: Crassyne, near loc 37526, 36025*
Hibernia: Carnue, near loc 23643, 15046
Midgard: Guntry, near loc 55608, 4958
 |
| Guntry, for Midgard players Often Doppelgangers will respawn on top of you while you are talking to these NPCs. If so, the easiest thing to do is finish out the conversation to advance the quest then run away. |
The suspicious goblins surrounding the collapsed NPC will turn into dopplegangers when approached or pulled. They don't BAF, so you can safely clear them out by pulling them one at a time. The NPC will then send you to kill the Currupt Alchemist in the clockwork section of labby. If you use the map and follow the directions, he isn't too hard to find.
Optional Shortcut: head back to the entrance, use the obelisk to teleport to the Clockwork: Shrine of Tegashirg. The alchemist is just NW of where you arrive, hanging out behind a pile of crates near loc 30704, 29192.
When you kill the alchemist, he will drop a Poison Antidote. Go back and talk to the NPC near the entrance. Occasionally I have had all of the dopplegangers respawn on top of me when I started talking to the NPC. When this happens I ignore them, finish the conversation, and then run them off.
*The Alb one is a bit harder to find than the others: Left at statue, follow the passage around the corner to the right, left at the next 4 way (turn left when you can see the entrance to the stairs down), right at the next intersection (towards the wall sconce with the glowing green gem embedded in it), follow the passage left when you get to the wall sconce, left again at the next intersection at another wall sconce, then take your next right and follow the passage back.
Part Three
Next you will be sent to frame minotaurs for murder. In each case there will be a named mob you need to kill surrounded by soldiers, after which you go to the spot the named mob was standing in and use an item from your inventory to plant fake evidence. Generally the soldiers don't BAF so you can clear them out by pulling them one at a time and then go after the named mob. After you kill the named, you need to be standing very close to where he spawns to use the item you are supposed to plant. Be sure the "use" icon for the right item is set to your hotbar before you start these encounters. Check your quest journal to see which one you need to use for any given encounter.
 |
| Commander Ellerdos surrounded by his guards. At least on Gaheris the guards don't BAF, so you can pull them one at a time and clear them out. However, when I most recently ran through this series of quests on Ywain, tagging any of these mobs got me all five. For all four of the named mobs I was supposed to frame for murder I ended up killing the commanders, running in to plant evidence where the named mob was previously standing (while the guards wailed on me), and then running away. |
Very often, the named mob and or his guards will respawn on top of you practically the moment you kill him. If you are still standing in the right spot, you can use your item and run away. Either run to a safe spot and kill everyone again, or try to run them off. If everything went well, the item you used will be gone from your inventory and your quest journal will tell you what to do next. The kill targets are:
(1st) Commander Ellerdos (Commander's Buckle ...NOT Button!): Near Loc 47057, 26710
(2nd) Commander Ottogron (Thelo Commander's Button): Near Loc 50387, 15627
The quest instructions about what item to use are sometimes wrong/ reversed. If you get the error message "Now is not the right time to use this item" after killing the first commander, use the other item instead. You might want to have both slotted to your hotbar when you kill him just in case. The kill targets that you are assigned may possibly vary somewhat from the two I listed above (if so, not very often). Regardless, the quest instructions are pretty clear on what hallways to look for your targets in. If you were able to find all the corpses in part one, you should have no problems.
After framing innocent minotaurs for two murders, go back to the trees near the (possibly non-existent) tower in Ellan Vanin and use your signalling whistle again.
Part Four
Head back to labby for two more murder frame-ups. Teleport back to the Shrine of Tegashirg in the Clockwork section. From the obelisk where you arrive, the first target is NW past the Currupt Alchemist. The second target is due west near a giant gear.
(3rd) Commander Talidrarg (Deifrang Signet Ring): Near loc 29423, 29406
(4th) Commander Irodrim (Korazh Insignia): Near loc 25380, 29481
 |
| Commander Irodrim and his gaurds. |
After using the insignia, go back to the trees near the tower icon in Ellan Vanin and use your signalling whistle one more time. Done finally!
1 platinum and a bit of gold, 20160 CXP
Note: If you are not playing a class or spec that melees well, you might have trouble finishing the next step without a party or a buffbot. Especially on a petless caster like a Runemaster or an Eldritch, you might want to wait until you have help available to accept the next quest (see below).
Unraveling: Kingly Crisis*
This is pretty neat quest. After talking to the NPC in EV, head to the throne room, ready for a fight. Eventually a demon you need to kill spawns. He cons purple at first, but will eventually debuff to orange (generally when you attack). This fight is a piece of cake on a character that melees well. On a pure caster, it can be a bit more tricky (see below). Once you beat the demon talk to the high consul, the king, and then your contact.
 |
| Excitement upon arriving in the throne room. |
Pure casters: The boss can be killed solo on a bolt caster like a wizard or eldritch, it's just a pain.** Kite the demon around the room and use pillars or other geometry to confuse him. Once you get far enough away, hit "face", snap off one or two high damage spells, then keep running. Once you whittle his health down enough, a group of minotaurs will show up and start beating on him.
 |
| This guy can be pretty tough to kill solo if you don't have a pet and can't do decent damage in melee, since the quest has you stuck in a confined space with him. |
If you need to kite the demon out of main room, don't re-enter. All of the dopplegangers will respawn when the boss leaves the room. Even outside of the main throne room, if you get the boss down low enough the minos will still spawn and start attacking. Once you kill the demon, the quest will update even if the dopplegangers are still hanging out in the throne room. You may need to talk to the high consul -> king -> contact -> high consul while getting beat on by dopplegangers to finish this quest and start the next one. Once you start the next quest, leaving the throne room and re-entering will get rid of any leftover dopplegangers.
518 Gold, 8400 CXP
*Don't start this quest unless think you can finish it! Once you start it the quest cannot be abandoned, and the throne room will be completely jacked up (i.e., infested with angry dopplegangers) every time you enter it until you manage to kill the demon. You will still be able to run in and talk to the king to go up CLs even if the room is infested with dopplegangers, but doing things like buying bounty point (illustrious) weapons will be annoyingly difficult (digging through NPC menus while getting beat on by four mobs isn't fun).
**I have done this solo in all three realms using bolt casters. Hibernia using a void Eldritch was by far the hardest of the three, and the only one where I actually needed to leave the main room. The hibernian main throne room is not set up well for kiting, instead I ended up running in circles around a planter in the middle room.
Culmination: Plan for Success
Once you start this quest, you are sent back to the Labyrinth to look for a priest. If you follow the map the quest hands out you'll get decent CXP from kills and at least a few seals if you are on Gaheris. You can also take a shortcut:
Albion: From the obelisk at the entrance to the labyrinth, go to Flooded: Shrine of Vartigeth (South)
Midgard: From the obelisk at the entrance to the labyrinth, go to Flooded: Shrine of Vartigeth (West)
 |
| When you arrive, look for a high priest near an idol of Vartigeth. |
The NPC you need to talk to is at the top a set of stairs near where you arrive. Target him and "/say resealing the Labyrinth."
1 platinum and some gold, 11200 CXP
Culmination: Lost, But Not Forgotten
Most of the steps in this quest are pretty easy to solo and self explanatory if you follow the instructions. For the first step, you just need to kill ten of the nearby corrupt priests.
Albion: the corrupt priests the near the Albion minotaur high priest most often con red. If you have made it this far chain killing reds shouldn't be a problem for you, but if you want a slightly easier time on this step teleport to Flooded: Shrine of Vartigeth (North or West). The majority of priests near those obelisks are generally orange.
The next step is to kill ten "corrupt engineers" for hammers and chisels. The only place I have been able to consistently find engineers is near the Shrine of Tegashirg in the Clockwork section. From the obelisk after you teleport in a few can spawn in the NW passage near the corrupt alchemist, but the best place to look for them is passage due West. If you don't see any, murder all the minotaurs in the western hallway down to the second intersection (the next intersection after the one with the gear), clear the passage that loops around to the south and back east from the second intersection, and finally wait for everything to respawn. You'll generally get at least two or three engineers as random respawns each time you clear out the hallway and the southern loop.
 |
| To find engineers, from the Clockwork: Shrine of Tegashirg obelisk head down the west hallway. When you get to the second intersection (shown above) turn to the south and loop around to finish out the "P" shaped path, killing every minotaur in sight save for the named mob and his gaurds. Every time you clear out this path and the mobs respawn, you'll get anywhere from 1-4 engineers. It usually takes me about three runs to get all the hammers and chisels I need. This is the best spot I've found for engineers, but there are in many other places in the Labyrinth where they can also appear. |
The last step has you gathering ward stone fragments. Some interesting flavor text appears when you pick up each fragment. When you have all 12, give the stack of fragments (which look like DF blood seals) to the High Priest to finish the quest.
Albion: there are no fragments near you when you get last step, and the quest text doesn't tell you where to look for them save in the flooded sections of the catacombs. I would have been utterly baffled by this if I had happened to try this chain on Albion before I had done it with characters from the other two realms. You need to head go to Flooded: Shrine of Vartigeth (North) or (West) to get the fragments. There are also a few up the stairs nearby, but you'll need to kill several (most likely red con) priests to even get to the first one.
1 platinum and some gold, 16000 CXP
Culmination: Thivek's Fire
This appears to be the last quest in the chain. The quest sends you to kill two bosses deep in the labyrinth, and use an item in your inventory after you beat each boss. The first boss can be soloed with a few classes. The second boss is likely impossible without at least a buffbot.
Boss 1: Adjucator II.
Shortcut: Take an obelisk to Clockwork: the Great Forge of Thivek, head SW
You will need a party or at least a buffbot to take out this boss on most classes. I have been able to solo it after a few tries using a tank pet buffed with the Convoker ML 9 ability (Summoning Mastery) on an Enchanter. I imagine any class with access to strong pets and summoning mastery could likely solo this boss, albeit not without a bit of luck.
To kill the Adjucator, you have to first clear all the goblin repairmen around him. You only have to clear the center of the room and the part of the room near the boss. If any repairmen respawn kill them first before focusing on the boss again, or they will keep him healed. He generally spawns as a purple, but sometimes only as a red. Regardless, he has a ton of hitpoints and hits like a truck. If I recall correctly you also can't really kite him because if you get too far out of the room after you pull him he resets, and it's too hard to keep both halves of the room clear of repairmen solo.
 |
| A few classes can take out this boss completely solo. If you want to try it, clear out the goblin repairmen in the center of the room and near the boss before you engage him. If any repairmen respawn while you are fighting him, switch targets and kill them before focusing on the boss again. As long as any repairmen are alive, he's pretty much impossible to kill (at least solo). |
Once the boss drops, quickly use the item the priest gave you to complete this part of the quest.
Boss 2: Maghras
Shortcut: Take an obelisk to Clockwork: Construct Assembly Room, head west.
I assume this is the final step in this entire quest chain. The majority of classes certainly can't solo this boss. I haven't been able to even using a ML 9 enhanced pet (but admittedly I've only tried once or twice). However, he is doable on some classes using only a buffbot (at least based on this youtube guide to farming him). I don't know if there are any steps past this fight because I've never beaten it, and there is no further information about this quest that I could find online. I assume the final reward is just more CXP and a platinum (and possibly a pat on the head), so I haven't yet tried to get a party together to take him down.
Regardless, if you have made it this far congratulations. You have gone through one of the more obscure and challenging (mostly) soloable quest chains in the game!
This guide is current as of March 2018, DAoC version 1.124D.


Comments
Post a Comment